All of the Things! Custom MS Search Vertical of Serverless Azure DB and the new SQL Graph Connector!

Microsoft Graph Connectors are now in preview mode and appear to be showing up for most folks who have turned on targeted releases in their Dev tenants. So, naturally, I had to see what we could break... er, do.
Just how much can we throw in here?
Just to spice things up for this blog post, let's see if we can pull in as many different and new-ish things into this bad boy.
SQL or bust
One of the first things I wanted to try out was the SQL Server connector. This is big win for SharePoint and 365 to be able to include 3rd-party structured data without any custom development. So it felt like a great candidate to try out first. So here was problem 1: I had no "on-prem" SQL database anymore. And SQL is expensive. Or is it? Pete Skelly turned my eyes towards serverless Azure SQL - a consumption-based model for SQL. Seems pretty new and cool to me. Let's throw it in!
Gotta have a VM
We want to mimic an "on-prem" experience, so that means trying to use the Power BI gateway to connect to our SQL database. So let's make sure we have a VM to install the gateway onto that will sign in with a dev tenant login and can then connect to the SQL server. Things are looking good. Anything else?
Some automation, perhaps?
What if we see how much of this we can build with ARM templates? Yeah, that sounds good. The ARM Tools extension for VSCode is pretty solid. Channel 9's DevOpsLab just started a video series on Demystifying ARM Templates, which shows the power of the MS team's JSON schema they've built. So yeah, why not throw that in. Plus, I've been wanting an opportunity to use the ARM Template Viewer extension in VSCode too, so now I have a reason and a way to visually represent almost everything we're creating for this little Graph Connector.
Wait, what are we doing again?

So here's the plan:
- Serverless Azure SQL database as a backend
- The AdventureWorks database loaded up with Product data
- Windows VM with a Power BI gateway to connect to the Azure SQL db
- A new graph connector, which uses the gateway to crawl Products, to display in a new vertical in MS Search results
- A custom adaptive card display (we gotta see if we can pipe in product pictures, right?)
Here's a high-level overview of the data flow, from SQL-to-VM-to-365:
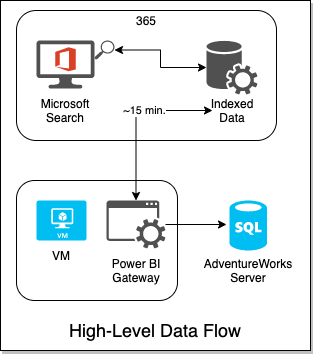
The VM's gateway will be controlled by the 365 Search service and graph connector API. Every 15 minutes, 365 will attempt an incremental crawl, by reaching out to the gateway on the VM, which will receive a query to execute agains the SQL DB on Azure. So let's get this party started.
ARMing ourselves (get it?)
Based on the above, here's what our ARM template needs to look like:
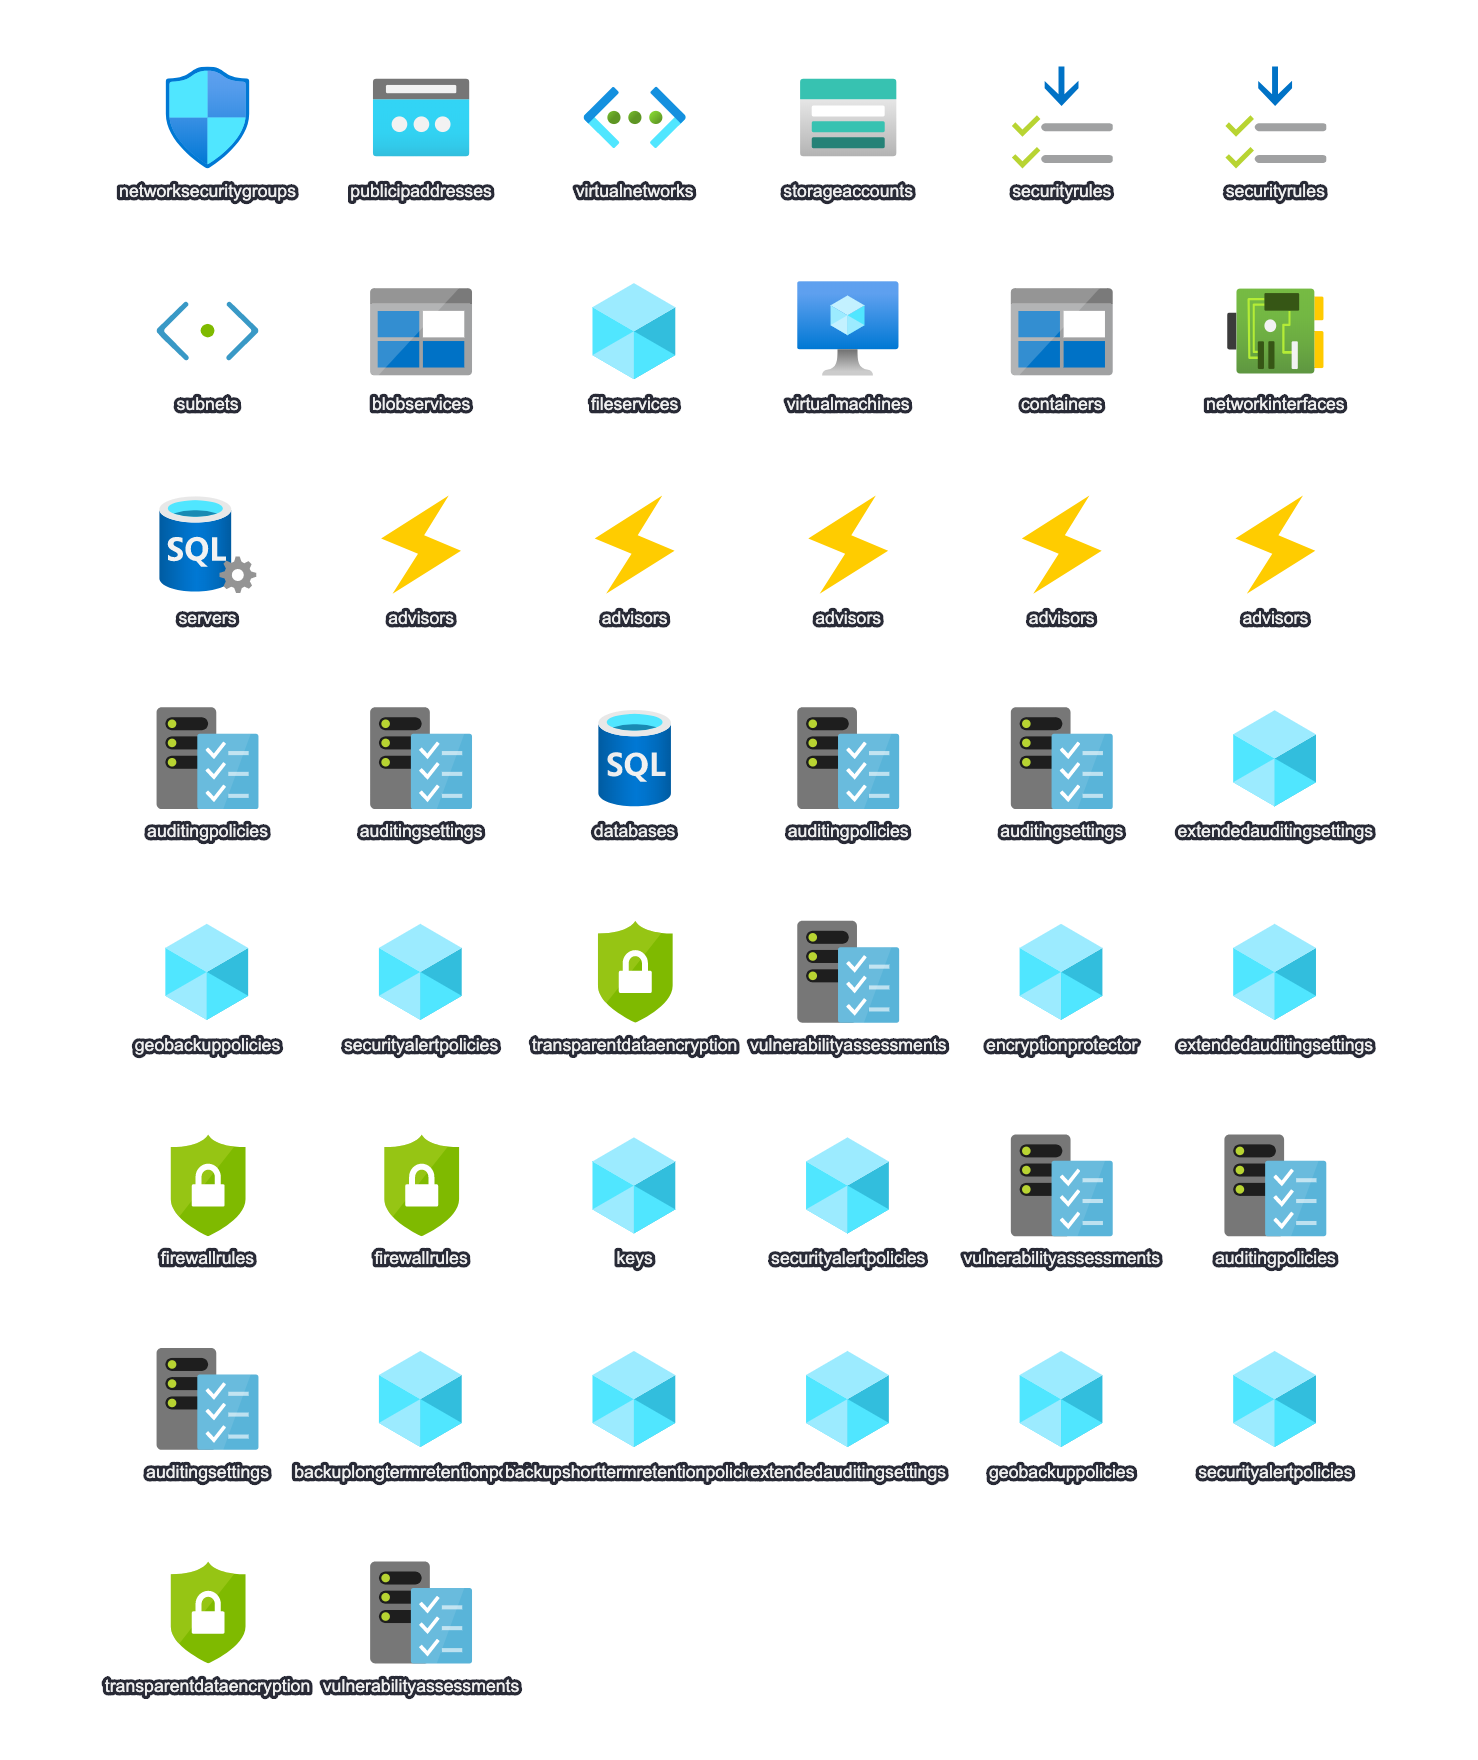
This diagram made possible by ARM Template Viewer.
Don't feel like making all of this? No problem! I've already set it all up and exported it to an ARM Template for you! I even went ahead and took the time to set it up a little better for automation. I've provided 2 files for you to use to get all of this provisioned automagically in your own tenant/subscription:
- full_simple.json - this is the ARM template that represents the above design
- runit.azcli - this is an Azure CLI script that is built for Bash.
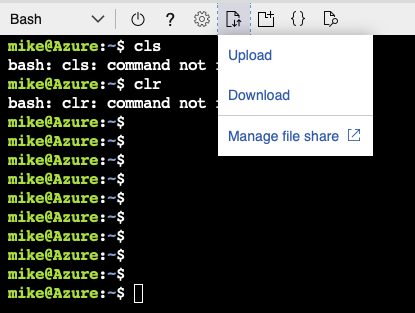
Simply put the 2 files next to each other from wherever you plan on running them. If you want to run it from the cloud shell, like I did, you'll just have to upload them first, like so.
The ARM Template JSON has a number of preset variables you should know about. If you want it to run successfully, you'll need to set them to be something unique for you. These variables are:
rg- A reprint of the resource group you plan on putting everything in. That will also get set in the runit.azcli. This name just gets used in some of the more generic naming of things like the NICs and NSGs that I'm hoping you don't have to even think about.vmname- The name of the VM that will get made for youlocation- This also gets set in runit.azcli so you don't necessarily have to set it here.servers_serverlessserverpoc_name- The name of the database server that will be createdadventureworks_dbname- The name of the database (defaults to HomolWorks)uniquedomainprefix- Should probably be the same as the name you pick for the VM - using this will make RDP'ing easiermy_ip- if you set this, then your IP will be automatically added to the firewall rules for the Database serversqladmin_account- the SQL admin user name. Defaults to POCAdminvmadmin_name- the VM admin user name. Defaults to captainawesome
Run it!
The script only has 3 variables it tries to preset before deploying the ARM template. Naturally you could edit this all you want and feed in more parameters rather than setting them up in the .json file. Only 2 variables really need to be set: rg and location. This ARM template is scoped to a resource group, so the script creates that Resource Group first, then deploys the ARM template to the group. Note that you can optionally set the IP you're developing from in the my_ip variable.
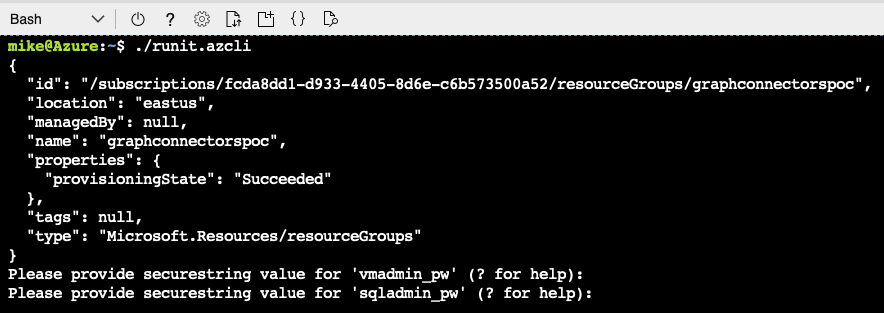
Once you've set rg and location, run the runit.azcli script from a terminal using Bash or Zsh. I ran mine from Azure Cloud Shell.
Not so bad so far, right? If you're feeling really adventurous, be sure to look over the ARM Template in full to see everything we've got going on. Lots of small stuff has been squirreled away so you don't have to care.
NOTE that I did actually get an error running the template, which was during the setup of one of the advisors for the SQL database, where I was told the resources were busy. But everything had actually executed fine, at least for the purposes of this Proof-of-Concept. So if you get that error, just make sure that the AdventureWorks database was provisioned in the new resource group and you should be good to go.
So, we're ARMed. What do we have to show for it?

Review and Connect
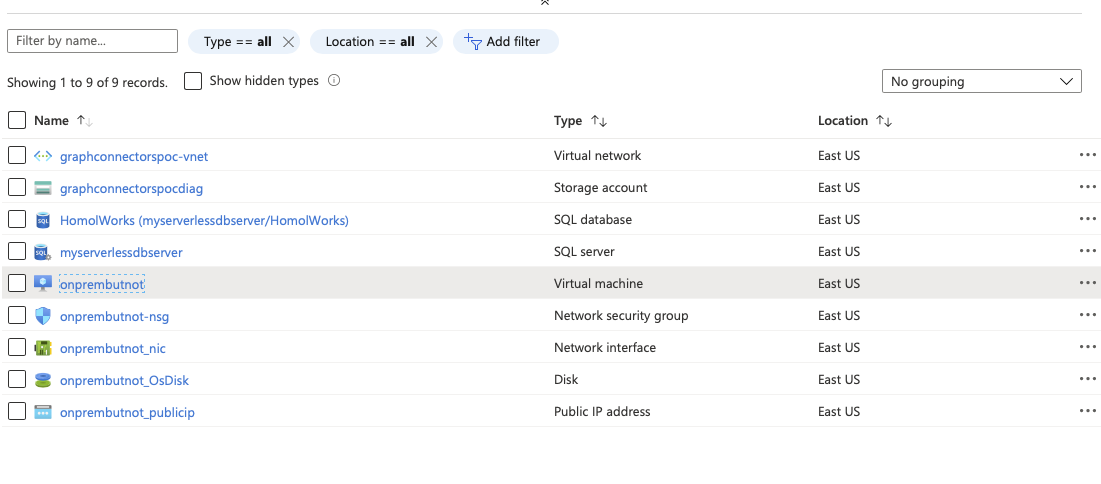
Let's review everything we have now that the script and ARM template have finished. First let's just take a look at the finished Resource Group. Quite a few resources have been generated and most of them will cost next to nothing. And here's the best part: you can just delete the resource group whenever and be done with this.
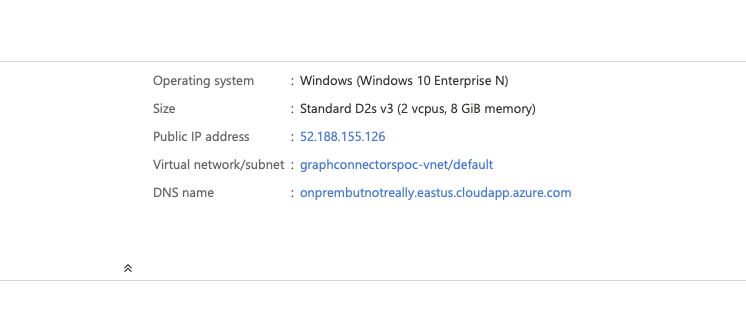
Click on the VM and notice the top right portion of the Overview tab. We have a static IP and a DNS. This will make for easy RDP, plus it has been beneficial to setting up our DB firewall.
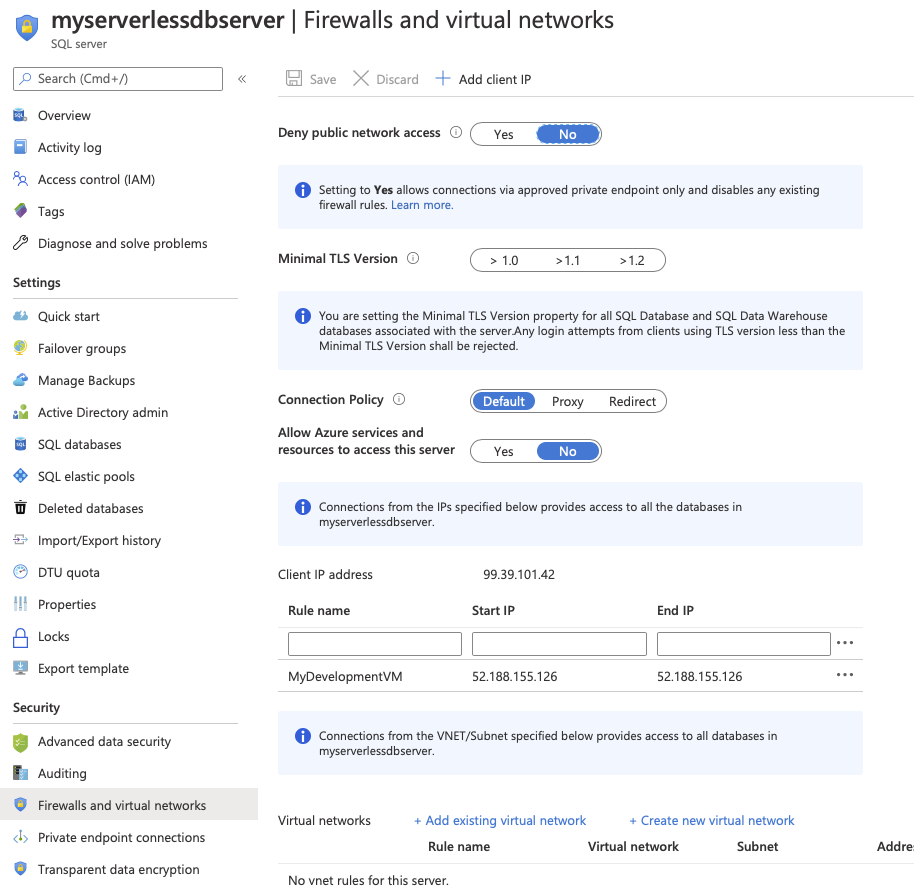
Let's see where that IP is used by SQL. Go back to the resource group and click on the SQL server. Then select the Firewalls and Virtual Networks option. Note in the IP Address rules that we already have an item added - the same IP as our VM. If you hadn't setup your IP, now could be a good time to add that a Save.
Gateway Time
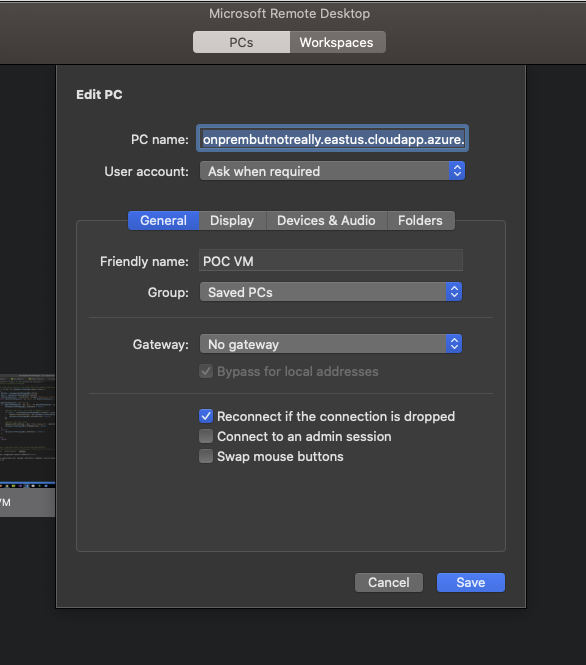
Remember that DNS? Well now's our chance to use it. Connect with your favorite RDP client, using the domain that was created and the VM admin account/password that you setup in the ARM template parameters.
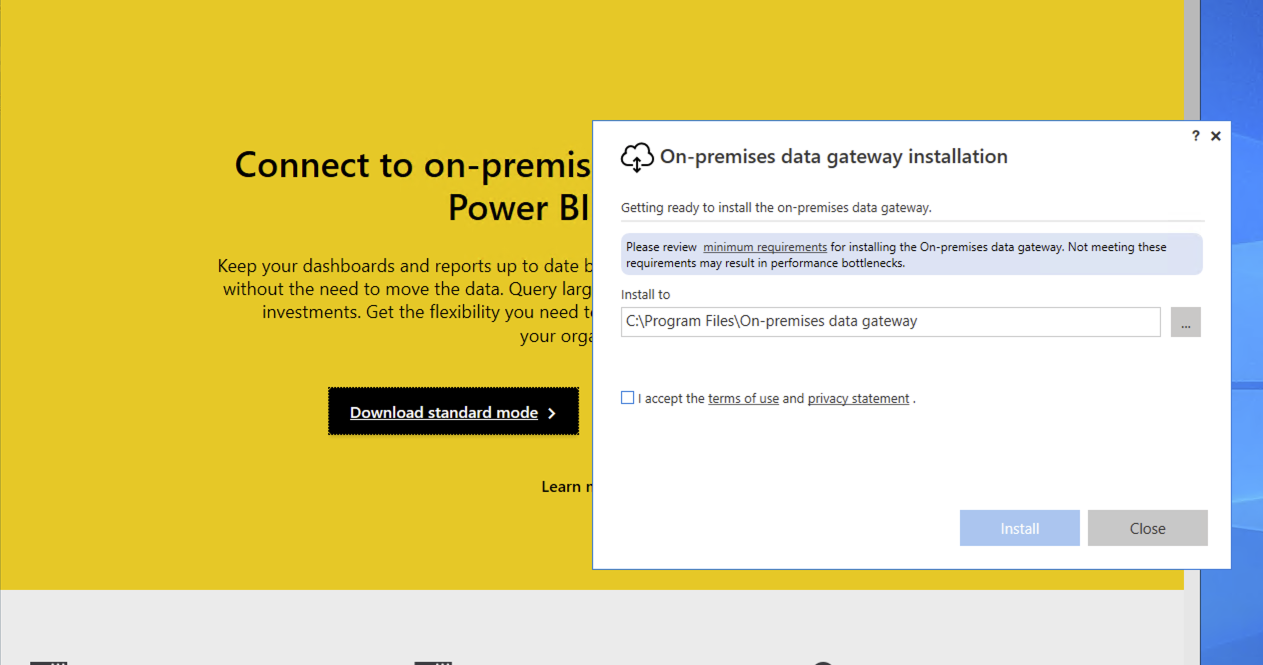
Time to install the gateway. To start go to https://powerbi.microsoft.com/en-us/gateway/ and select Download Standard Mode.
Once it's installed, sign in using your dev tenant admin account.
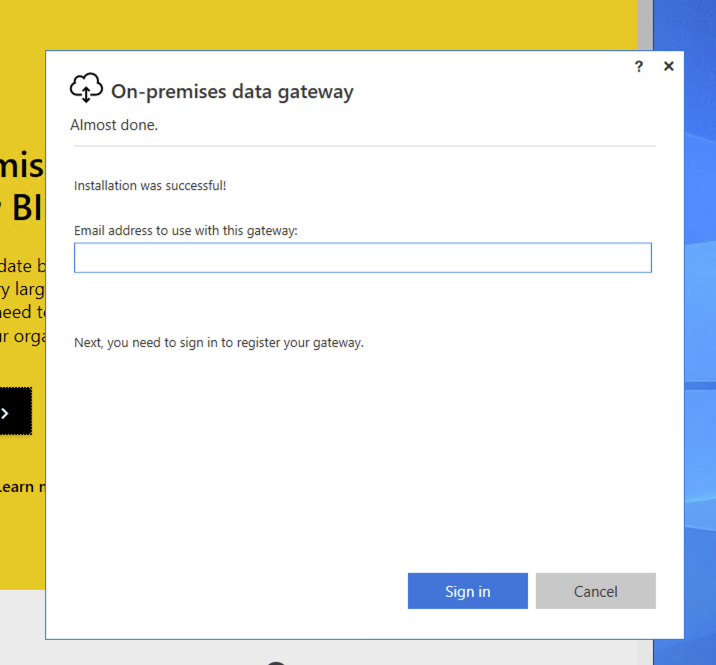
Choose Register a new gateway on this computer.
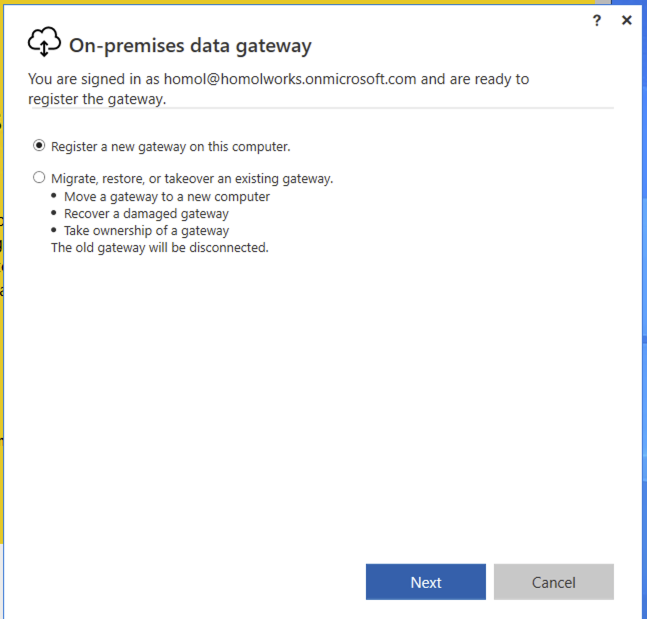
Finally, setup a name for the gateway and a recovery key (which is a passphrase of your choosing).

Graph connector setup
Okay, we're almost there. Time to setup our sql graph connector. First, let's confirm that you can even do this. As we mentioned earlier, this is still in preview mode at the time of this writing, so if you want to have a shot at seeing the connectors, you need to set you organization settings to getting targeted releases. See the animation below for accessing that setting from the 365 admin center:

Here's where you go to access connectors. In the 365 admin center, select Settings->Microsoft Search and confirm that you have the Connectors tab.

To connect to our SQL Server, click Add, then Microsoft SQL Server. Then supply a Name, a Connection ID (just a unique identifier of your choosing) and a description. Finally accept the terms to proceed.
After we click Next, it's time for us to setup our database connection. Finally! To get your connection string, head back over to Azure and select your database. Then select the Connection Strings option along the left. The first tab holds the information you'll need over in your 365 dev tenant.

Note that in the Database Settings step for the graph connector, the On-premises gateway is selectable. You should see the name you provided for your gateway in there. Select it. Fill out the parts need for the connection and click Test Connection.
What's happening under the hood is that 365 is reaching out to the gateway agent running on your VM and then making the connection to the database, which has allowed your VM to connect through it's Firewall rules. Pretty neat, huh?

What exactly is in this AdventureWorks, anyway?
Okay, so the last few steps of the Graph Connector are about setting up the data to be crawled. So what exactly do we have here? We're going to focus on Products. Here's a quick snapshot of the tables though from the Azure Data Studio:
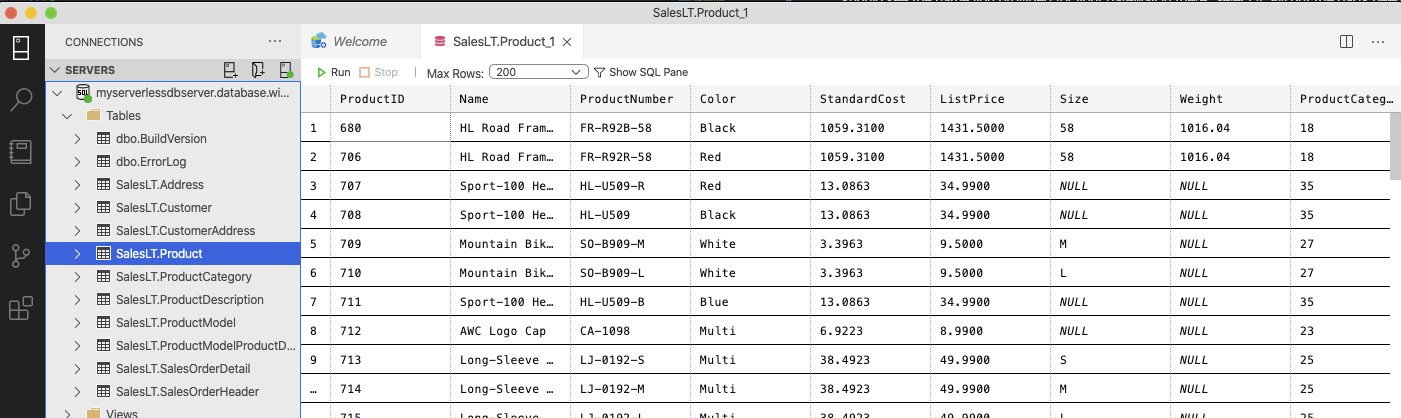
We intend to target Product and we will also include the Product Model through a join.
The next step in the Graph Connector setup is to provide our full crawl query. Note that we are expected to provide a date field that we will base the query off of, so that only items added after the previous crawl will be pulled to make things more efficient. This is the watermark field (@watermark). We have chosen CreateDate as that field.
Hold up. There is no CreateDate field. Well done, young padawan. Oddly enough, the MS folks didn't think to have one. So we will need to do it for them. Go back to Azure and select your AdventureWorks database. Click the Query Editor (preview) on the left hand side and log in with the database admin account you provisioned. Run this query:
ALTER TABLE SalesLT.Product
ADD CreateDate datetime not null
CONSTRAINT Product_CreateDateInit DEFAULT GETDATE()
This gets us the CreateDate field we need along with a default date in it. The first crawl is a NULL watermark anyway so everything is coming in.
With that little bonus step out of the way, here's our query for the full crawl:
SELECT p.[ProductID]
      , p.[Name]
      , p.[ProductNumber]
      , p.[Color]
      , p.[Size]
      , p.[ProductCategoryID]
      , p.[ProductModelID]
      , p.[SellStartDate]
      , p.[SellEndDate]
      , p.[DiscontinuedDate]
      , p.[ThumbnailPhotoFileName]
      , p.[rowguid] as ProductGuid
      , CAST(p.[CreateDate] as smalldatetime) as [ProductCreated]
      , CAST(p.[ModifiedDate] as smalldatetime) as [ProductModified]
      , pm.Name as [Model]
      , pm.rowguid as ModelGuid
FROM [SalesLT].[Product] p
    INNER JOIN [SalesLT].[ProductModel] pm on p.ProductModelID = pm.ProductModelID
WHERE p.[CreateDate] > @watermark
Choose DateTime as the watermark data type and press the Validate Query button. Select the watermark field, which we aliased as ProductCreated, then select the unique identifier field, which is ProductId. Notice we have a print out of the first 10 rows of data as well. Interesting side note here: currently money and float fields appear to not be supported by the graph connector. That's why ListPrice was left out of the query.

Next we set the incremental crawl. This will append anything that has been modified since the last incremental crawl run. This step is optional but I recommend it. The crawl looks very similar to the full crawl, but instead our @watermark is based on ModifiedDate instead. Here's the query:
SELECT p.[ProductID]
      , p.[Name]
      , p.[ProductNumber]
      , p.[Color]
      , p.[Size]
      , p.[ProductCategoryID]
      , p.[ProductModelID]
      , p.[SellStartDate]
      , p.[SellEndDate]
      , p.[DiscontinuedDate]
      , p.[ThumbnailPhotoFileName]
      , p.[rowguid] as ProductGuid
      , CAST(p.[CreateDate] as smalldatetime) as [ProductCreated]
      , CAST(p.[ModifiedDate] as smalldatetime) as [ProductModified]
      , pm.Name as [Model]
      , pm.rowguid as ModelGuid
FROM [SalesLT].[Product] p
    INNER JOIN [SalesLT].[ProductModel] pm on p.ProductModelID = pm.ProductModelID
WHERE p.[ModifiedDate] > @watermark
Similar to the full crawl, choose DateTime as the watermark data type and press the Validate Query button. Select the watermark field, which we aliased as ProductModified, then select the unique identifier field, which is ProductId. I skipped the soft delete section for now. I also skipped leveraging any type of row-level security, which is actually supported and documented in Microsoft writeup on the SQL Graph Connectors. Essentially, you would need to include ACL columnsin the full and incremental crawls, named AllowedUsers, AllowedGroups, DeniedUsers, and DeniedGroups. Each column is expected to be comma or semicolon delimited and can include UPNs, AAD IDs or Security IDs. I just wanted to see if we could get this data coming back and looking good!
The last big step is our Manage Schema step. We define what can be queried, searched and retrieved. If an item is found in search, you can only show it in the adaptive card layout if it's been marked as Retrievable, thus added to the schema. So select what you want. I went with anything text-based to be searchable and pulled almost all fields into the schema by marking them as Retrievable.
The last few steps are a bit of a breeze, especially since I chose not to do ACL columns and row level security.
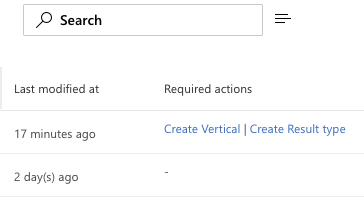
Results design and vertical
Our final step is to create our vertical and design the result set. After creating the connector, you'll see some callouts on your new connector in the Required Actions column. You can either click there to set things up or you can access Results Types and Verticals in the Customizations tab. As of the time of this writing, the best order of events is to setup the Result Type first then the Vertical. If you do it the other way, you will have 1 extra step to Enable the Vertical after you finish setting up your result type.
Time to Adapt
Let's start with the Result Type. Here are the basic steps, which the below GIF flies through:
- Set a name for the result type
- Tie it to a Content Source, which will be the new Graph Connector you made
- Apply any display rules (I skipped this)
- Design the layout
- Review and Finish
The big thing here is our layout design. We are provided a link on this step to the Search Layout Designer. Select a design to start with and Click the Get Started button. This takes you to the designer where you can layer in the fields you want to replace the template with. We want to make some substantial changes, so let's click the Edit Layout button. This layout designer leverages the Adaptive Card schema to do it's magic. Also, any field we set as retrievable and is in the schema is now a field we can display in the layout. Here's what I built:
{
  "type": "AdaptiveCard",
  "version": "1.0",
  "body": [
    {
      "type": "ColumnSet",
      "columns": [
        {
          "type": "Column",
          "width": "auto",
          "items": [
            {
              "type": "Image",
              "url": "https://github.com/mhomol/AdventureWorksThumbs/blob/master/thumbnails/{ThumbnailPhotoFileName}?raw=true",
              "size": "Medium",
              "horizontalAlignment": "Center",
              "altText": "Not available"
            }
          ],
          "height": "stretch"
        },
        {
          "type": "Column",
          "width": 8,
          "items": [
            {
              "type": "TextBlock",
              "text": "[{Name}](https://somemadeupurl.net/{ProductID})",
              "color": "Accent",
              "size": "Medium",
              "weight": "Bolder"
            },
            {
              "type": "TextBlock",
              "text": "{Model} ({ProductNumber})",
              "weight": "Bolder",
              "color": "Warning"
            },
            {
              "type": "TextBlock",
              "text": "First sold on {{DATE({SellStartDate}, LONG)}}",
              "spacing": "Small"
            }
          ],
          "horizontalAlignment": "Center",
          "spacing": "Medium"
        },
        {
          "type": "Column",
          "width": 3,
          "items": [
            {
              "type": "FactSet",
              "facts": [
                {
                  "title": "Color",
                  "value": "{Color}"
                },
                {
                  "title": "Size",
                  "value": "{Size}"
                }
              ]
            }
          ]
        }
      ]
    }
  ],
  "$schema": "http://adaptivecards.io/schemas/adaptive-card.json"
}
Feel free to paste this into the Layout Payload Editor to see what it will look like. If you want to see a preview of it you'll need sample data to paste into the Sample Data Editor tab. Try this:
{
  "Name": "Classic Vest, L",
  "Model": "Classic Vest",
  "ProductNumber": "VE-C304-L",
  "ProductModified": "2008-03-11T10:01:36Z",
  "SellStartDate": "2007-07-01T00:00:00Z",
  "ProductId": "866",
  "Color": "Red",
  "Size": "M",
  "ThumbnailPhotoFileName": "awc_jersey_male_small.gif"
}
What's the deal with the thumbnail?
Here's the last "special" thing we wanted to add to the heap of "All the Things". In the AdventureWorks Products table, there are Thumbnail binaries and Thumbnail names. Well, of course, I wanted to see these thumbnails come through in the results. Varbinary fields aren't supported by the crawler, so I had 1 of 2 options: either make an endpoint that would pull the item from the database for the Product ID on any call and return the byte array as the response or pull all of the binaries out of the database once and save them to files elsewhere. I chose the latter. Here's the source for it if you want to do something similar yourself. So now I had the files I needed in github, named by the ThumbnailPhotoFileName field value. So that's how I'm able to include that in my layout.
Here's a quick rundown of setting up the Result Type:
Last, but not least, we make our Vertical. It's even simpler.
- Provide a name
- Select the Content Source
- Provide a KQL query (optional I skipped it)
- Review and Finish
- Click the button to Enable Vertical
Here's a quick rundown of setting up the Vertical:
Out of the oven

So what exactly have we cooked up here? Let's head over to a search box somewhere and type something in that we know is a word in the Products or Models. How about mountain?
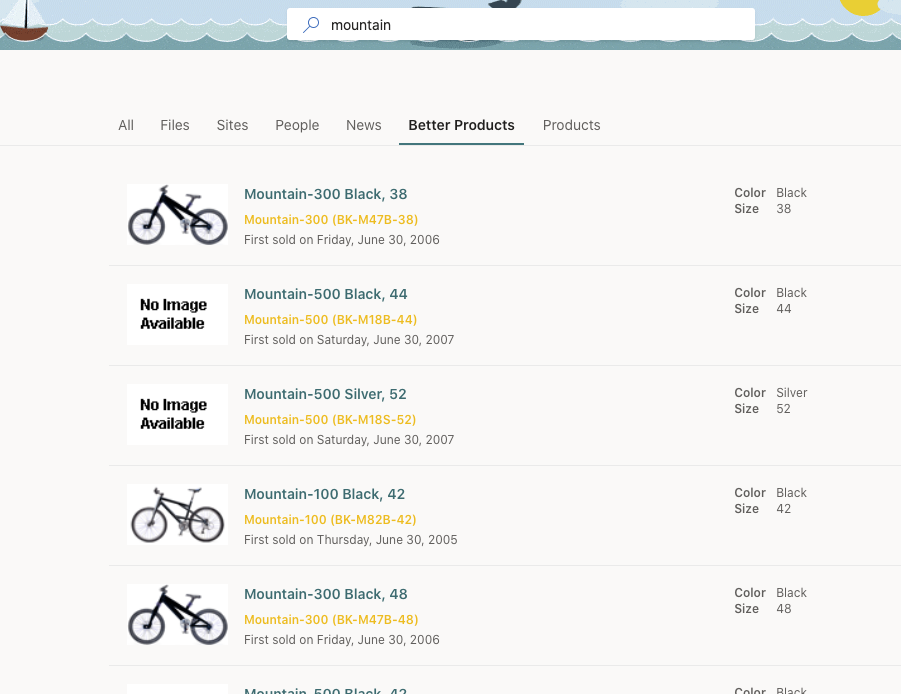
So there we have it! It was a lot to toss into the pot, but I think we brought it all together nicely. Hope you've learned a little something and that it gets you thinking about what you want to do next with the new Graph Connectors and what other structured data you may want to start piping into Microsoft Search for your customers and employees. Don't forget to delete this resource group when you're done messing around. Enjoy!